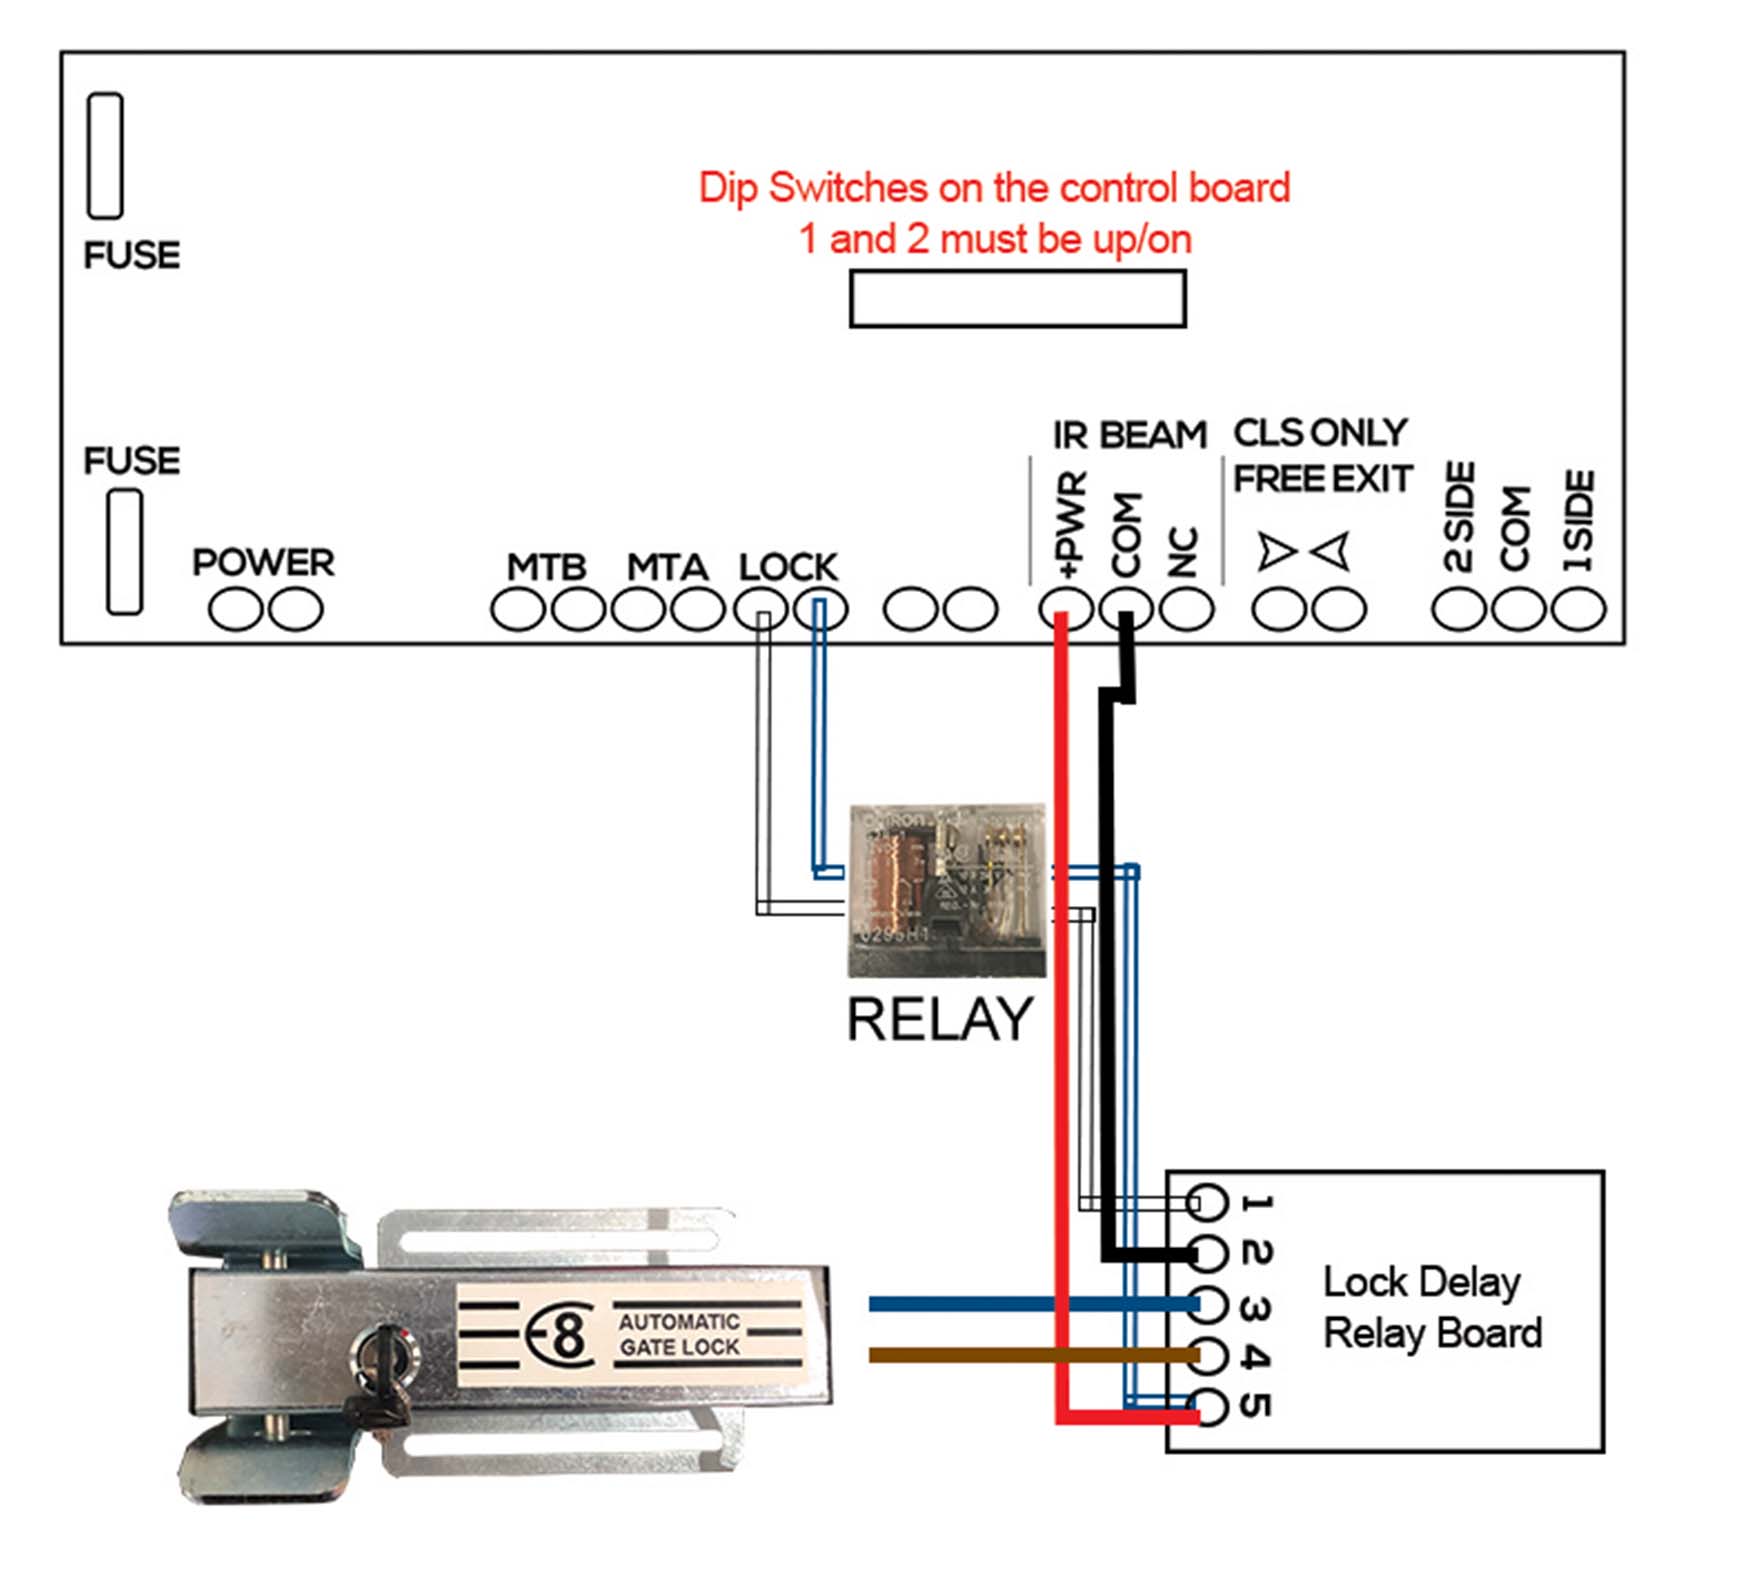
Product Catalogue

Product Catalogues

Swing Gate Automation
E8 500 solar kit catalogue

E8 500
Solar kit

12v Single & Double Gates

View our catalogue here

E8 500 electric kit catalogue

E8 500
Electric kit

12v Single & Double Gates

View our catalogue here

TMT 400LLS solar kit catalogue

TMT 400LLS
Solar kit

24v Single & Double Gates

View our catalogue here

TMT 400LLS electric kit catalogue

TMT 400LLS
Electric kit

24v Single & Double Gates

View our catalogue here

Slide Gate Automation
TMT 800LS electric kit catalogue

TMT 800LS
Sliding Kit

Electric Kit Only

View our catalogue here

DACE ACDC electric kit catalogue

Ultima AC/DC 800
Sliding Kit

Electric Kit Only

View our catalogue here

DACE Ultima HT electric kit catalogue

Ultima HT18/36
Sliding Kit

Electric & Solar Kits

View our catalogue here

DACE Ultima RT electric kit catalogue

Ultima RT25/50
Sliding Kit

Electric & Solar Kits

View our catalogue here

Read more: Product Catalogue

  • Hits: 10612

TMT 800LS Servicing

TMT 800LS Motor Servicing

The TMT 800LS gate operator, much like a car, will provide many years of excellent service if a service schedule is carried out at regular intervals. Follow these basic checks and do repairs in time to get the most out of your operator.
WEEKLY
  • Clear away any dirt, sand, stones or foliage collected on the gate rail.
  • Clear away any branches, shrubs or grass that might interfere with the movement of the gate.
MONTHLY
  • Check for damage or cracks to the motor lid. Although the operator lid is designed for outside conditions, stones and severe hail may damage it. A cracked lid should be immediately replaced as water and dirt will damage the operator.
  • Check physical end stops are secure and in place
  • Check for insect and reptile infestations.
  • It is recommended that moth balls be placed inside the operator housing to discourage these infestations which can cause damage.
EVERY 6 MONTHS
  • Place the motor into manual mode and test the gate by opening and closing slowly, take note of any tight sections you may feel.
  • Check for any battery leaks if you have added a battery, these can cause damage to the wiring.
  • Check that the controller and other accessories are firmly in place and are not hanging loose.
  • Check that the limit brackets on the racking have not shifted.
  • Check guide rollers on the gate.
  • Check all brackets are secure.
  • Check the motor is firmly in place and cannot move.
  • Check the rack for any damaged teeth.

Read more: TMT 800LS Servicing

  • Hits: 9796

TMT 800LS quick setup guide

TMT 800LS Quick Setup Guide

Our first step before installing the motor is to ensure that your gate is setup correctly for manual operation.
tmt 800LS setup guide aluminium gate track

Sliding gate track

Ensure your aluminium or steel track is well bolted down to the concrete with no movement.
sliding gate wheels

Gate wheels

Ensure your wheels are in good condition and that you can manually push your gate without any change in your push force.

It's not advised to use 3 wheels

siding gate stop

Gate stop

A gate stop is required for the open position. This will prevent the gate from running off the track if the gate fails to stop.

The motor will learn from this stop.

gate stop sliding gate catcher

Gate catcher

The gate catcher is required for the closed position of the gate. This will help prevent anyone from trying to lift your gate off the track as well as a fail safe for stopping.

The motor will learn from this stop catcher.

gate catcher sliding gate guide and rollers

Gate guide

2 options of guiding your gate as it moves and keeping it upright. Firstly the guide and roller setup (as shown in photos) and secondly the slide guide and block setup.
gate guide sliding gate level and set for motor installation

Gate check

Last thing to check is that your gate is plumb in the open and closed positions.
gate level

Placing the motor into manual override

TMT 800LS Sliding gate motor
Insert Key
TMT 800LS Sliding gate motor
Turn key clockwise to unlock device
TMT 800LS Sliding gate motor manual release
Pull the release bar open and slide gate

Anchoring the foundation plate

With your concrete slab layed and the correct positioning sorted for your conduit - place the foundation plate on the concrete slab and feed the conduit through the cable inlets of the base plate. Keep a 60mm distance between the edge of the base plate and the gate frame. This measurement is based on BMG racking.
TMT 800LS Sliding gate motor base plate installation
Attach the base plate to the slab, using the 4 bolts supplied or other fixings.
TMT 800LS Sliding gate motor base plate installation TMT 800LS Sliding gate motor base plate installation

Secure the motor to the base plate

Secure the motor to the base plate using the 4 screw holes.
TMT 800LS Sliding gate motor installation TMT 800LS Sliding gate motor installation
Manually move the gate fully open and closed very slowly to ensure that the gate does not collide with the motor in any way.

Securing your wires - Outdoor Transformer & Internal Transformer

Feed your cables through one of the 2 inlets as shown below and secure them through the locking tab
Outdoor Transformer Setup - securing cables
TMT 800LS Sliding gate motor installation
Wire in outdoor transformer as shown below
TMT 800LS Sliding gate motor installation wiring in transformer
Internal Transformer Setup - securing cables
TMT 800LS Sliding gate motor installation
Hard wire power in as shown below
This MUST be done be a qualified electrician.
TMT 800LS Sliding gate motor installation wiring in transformer

Mounting the rack on the gate

1. Rest the rack on the pinion with the end of the gate aligned. Have the gate in the full open position, clamp one end of the rack to the gate and screw the other end on.
TMT 800LS Sliding gate motor installation
2. Fasten the rack to the gate with the self drilling TEK screws through the slots in the rack. To attach additional rack, slide the gate closed and repeat the procedure.
Installing sliding gate racking TMT 800LS Sliding gate motor installation

Mounting the marker magnet - EXTREMELY IMPORTANT

Limit brackets with supplied screws
TMT 800LS Sliding gate motor installation
Limit bracket attached to racking
TMT 800LS Sliding gate motor installation
Make sure your motor is in manual mode. Open the gate until it hits the ground stop, now pull the gate back 40mm and install the limit bracket onto the racking, slide the gate bracket along until it just hits the spring (see image below), now screw the limit bracket to the racking.
TMT 800LS Sliding gate motor installation
Slide the gate into the closed position till it hits the catcher stop, pull the gate back 40mm and install the limit bracket onto the racking, slide the bracket along until it just hits the spring (see image below) and screw it to the rack, ensure both limit brackets are level.
TMT 800LS Sliding gate motor installation
Note: limits may require small adjustments after the gate has performed its system learn. Once the sysetm learn has been performed, operate the gate to open/close and ensure the gate doesn’t touch the physical end stop. A 20mm gap is preferred.

Wiring up and performing the System Learn

Once your gate and motor are setup correctly, you can then move onto wiring up your transformer. You will find these details on page 10 of your user manual. We recommend doing the System Learn on your motor first before adding any other accessories and operating the gate a few times to make sure your setup is correct and the motor is operating as it should.

Check out the video for further help with setting up the motor and performing the System Learn.

Read more: TMT 800LS quick setup guide

  • Hits: 11175