Christmas Closure Dates - 18.12.2026 (@ 3pm) - Re open 12.01.2027 (@ 9am) Any orders placed over this period will be shipped out the week of the 11th January 2026

DACE Ultima setup

Installing and setting up for the Ultima DACE Motor

Our first step before installing the motor is to ensure that your gate is setup correctly for manual operation.
DACE Ultima guide setup for installing the motor aluminium gate track

Sliding gate track

Ensure your aluminium or steel track is well bolted down to the concrete with no movement.
gate wheels

Gate wheels

Ensure your wheels are in good condition and that you can manually push your gate without any change in your push force.

It's not advised to use 3 wheels

gate stop

Gate stop

A gate stop is required for the open position. This will prevent the gate from running off the track if the gate fails to stop.

The motor will learn from this stop.

gate stop gate catcher

Gate catcher

The gate catcher is required for the closed position of the gate. This will help prevent anyone from trying to lift your gate off the track as well as a fail safe for stopping.

The motor will learn from this stop catcher.

gate catcher gate guide brakect and rollers

Gate guide

2 options of guiding your gate as it moves and keeping it upright. Firstly the guide and roller setup (as shown in photos) and secondly the slide guide and block setup.
gate guide gate level

Gate check

Last thing to check is that your gate is plumb in the open and closed positions.
gate level

Accessing the motor and removing the lid

Open the 'manual release door' and pull the release pin towards you until the lid is free. The lid can now be removed.
Unlocking the DACE ultima to remove the lid

Placing the motor into manual override

To check if the motor is already set to manual mode, try turning the cog clockwise. If the cog turns then you know it's already in manual mode and if it doesn't turn then follow the instructions below.

Open the 'manual release door' and rotate the thumbwheel clockwise up to 5 full revolutions which should release the cog and place the motor into manual mode. The thumbwheel should not be allowed to rotate too far.

To re-engage the motor when you have it setup on the gate, rotate the thumbwheel counter clockwise while pushing on the gate until you hear a click in the gearbox.

DACE ultima Placing the motor into manual override

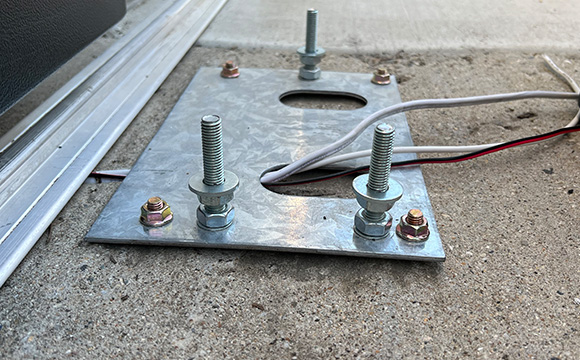
Anchoring the foundation plate

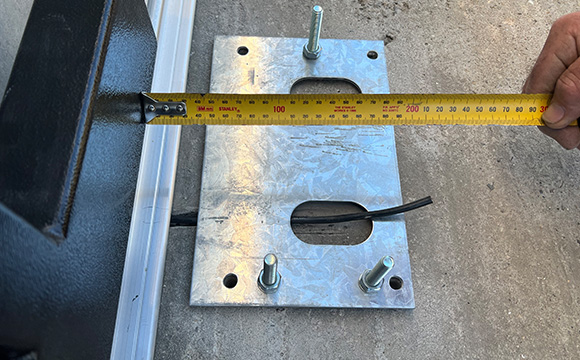
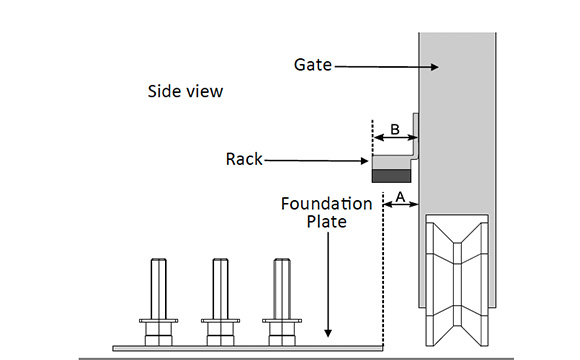
With your concrete slab layed and the correct positioning sorted for your conduit - place the foundation plate on the concrete slab and feed the conduit through the cable inlets. Ensure a 35mm clearance between the inner edge of the foundtion plate and the edge of the gate. This measurement is based on BMG racking.
Installing the base place on the DACE Ultima
To calculate the clearance required between the edge of the foundation plate and the edge of the gate (A), measure the width of the rack (B) and minus 5. eg. If the width of the rack is 40mm, less 5 = 35mm. Thus the clearance required is 35mm.
Installing the base place on the DACE Ultima
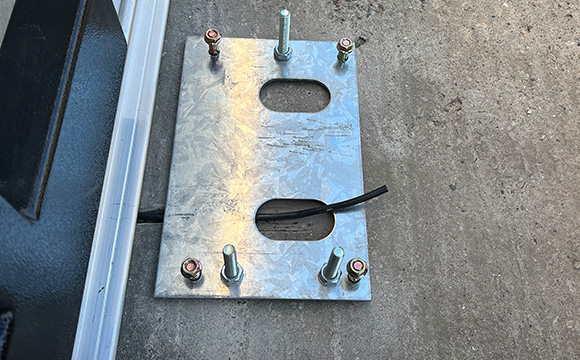
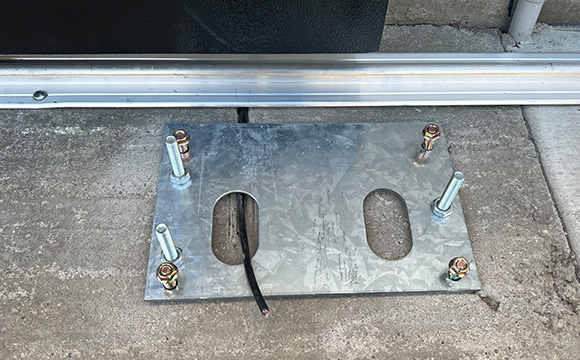
Attach the foundation plate to the slab using 4 x 8mm anchors.
Installing the base plate on the DACE Ultima Installing the base plate on the DACE Ultima

Secure the motor to the foundation plate
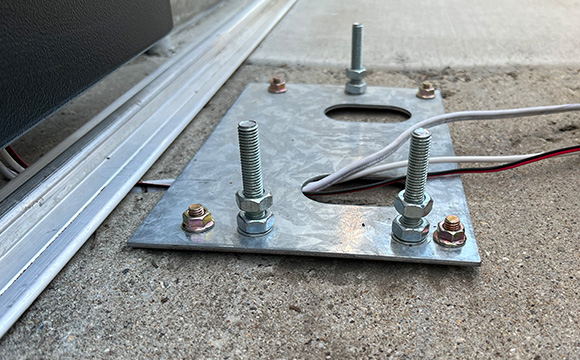
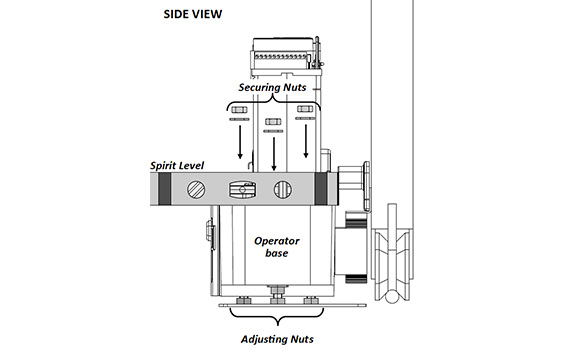
Secure the mounting nuts to the base plate as shown, allowing a 5mm gap for fine height adjustment at a later time.
Place a washer on top of each nut.
Installing the base plate on the DACE Ultima Installing the base plate on the DACE Ultima
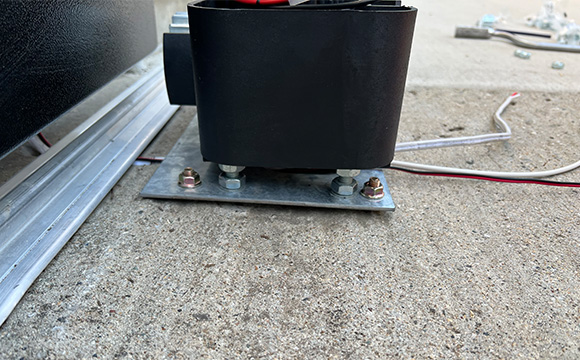
Mount the motor onto the foundation plate.
Mount the motor onto the foundation plate DACE Ultima
Check with a spirit level.
Mount the motor onto the foundation plate DACE Ultima
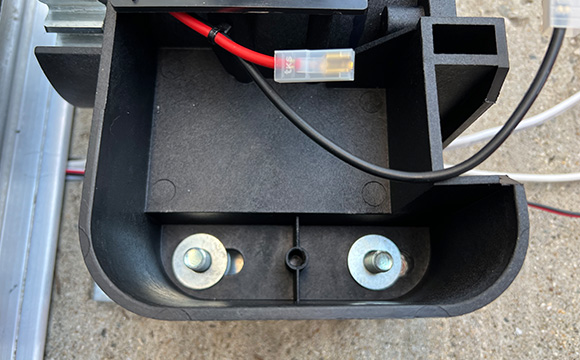
1. Place a washer onto each bolt.
Mount the motor onto the foundation plate DACE Ultima
2. Then place a nut onto each washer
Mount the motor onto the foundation plate DACE Ultima
Manually move the gate fully open and closed very slowly to ensure that the gate does not collide with the motor in any way.

Mounting the rack on the gate

1. Rest the rack on the pinion with the end of the gate aligned. Have the gate in the full open position, clamp one end of the rack to the gate and screw the other end on.
Mount the gate rack to on the gate
2. Fasten the rack to the gate with the self drilling TEK screws through the slots in the rack. To attach additional rack, slide the gate closed and repeat the procedure.
Mount the gate rack to on the gate
There must be a 2mm clearance between the mounted rack and the pinion.
Mount the gate rack to on the gate
After the rack has been attached, use the height adjustment nuts on the foundation plate to get your 2mm gap.
Mount the gate rack to on the gate

Placing oil in the gearbox - VERY IMPORTANT

The gearbox has been supplied with no oil. You will need to fill the gearbox with the oil provided before commissioning the motor. Failing to do this may damage the motor and void your warranty.

Only us SAE75W-90 oil to refill

Fill the gearbox with the oil provided as shown. The entire (70ml) must be emptied into the gearbox.
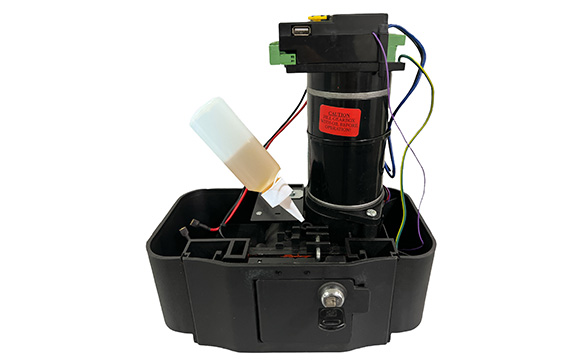
Placing oil in the DACE Ultima motor

Mounting the marker magnet - EXTREMELY IMPORTANT
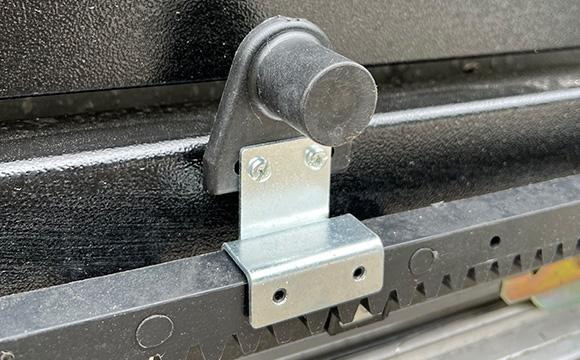
Mounting the marker magnet on the racking Mounting the marker magnet on the racking

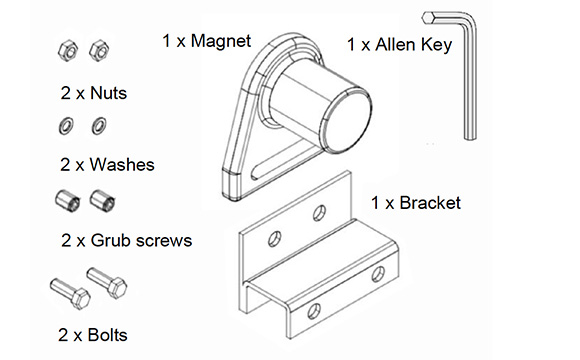
Asselmbling the magnet


Step 1. Install the grub screws with the allen key
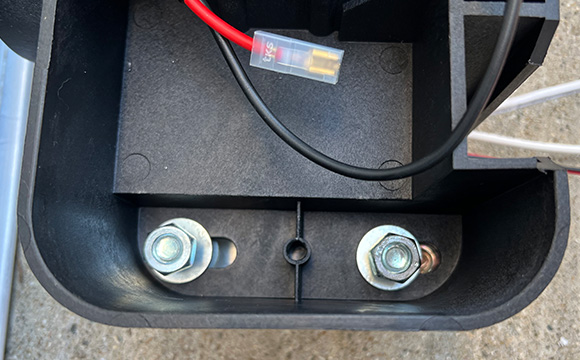
Step 2. Install the 2 bolts
Step 3. Attach the magnet to the bolts
Step 4. Attach the washers
Step 5. Attach the nuts and tighten
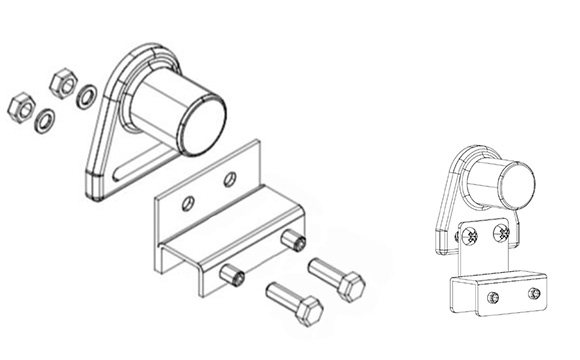
Mounting the marker magnet on the racking

Mounting the magnet


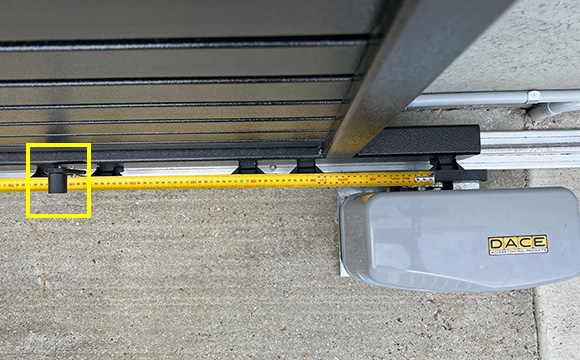
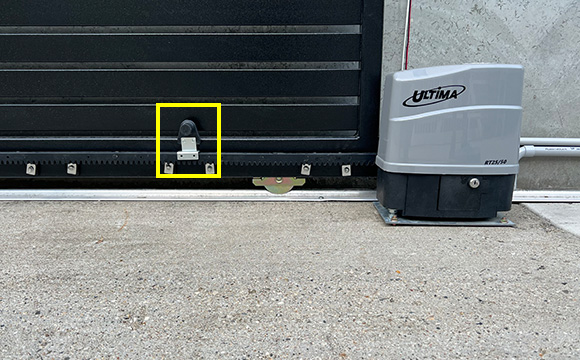
Step 1. Push the gate to the fully closed position.
Step 2. Place the magnet on the rack, 600mm from the centre of the motor.
Step 3. Secure the magnet bracket to the gear rack and tighten grub screws.
Step 4. The space between the lid and the magnet must not exceed 3mm. If it does, place washers behind the magnet to reduce the space.

Do not invert the magnet. Only use the magnet supplied with the operator.
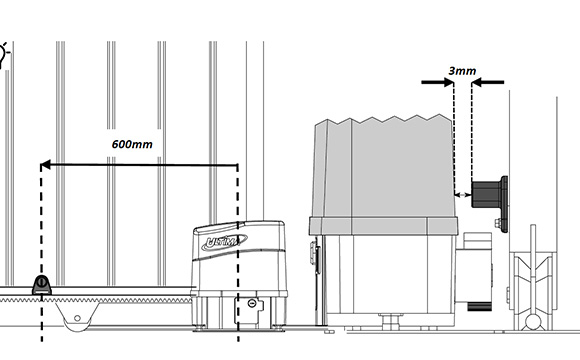
Mounting the marker magnet on the racking Mounting the marker magnet on the racking Mounting the marker magnet on the racking

Wiring up and commissioning your motor

Once your gate and motor are setup correctly, you can then move onto wiring up your power option which will be either transformer or solar and connecting your 12v battery. You will find these details on page 18 of your user manual. We recommend commissioning your motor first before adding any other accessories and operating the gate a few times to make sure your setup is correct and the motor is operating as it should.

Check out the commissioning video below for extra help.

Read more: DACE Ultima setup

  • Hits: 43658

TMT 400LLS swing gate automation

SWING GATE AUTOMATION

TMT 400LLS Solar & Electric Swing Gate Opener Kits

The TMT 400LLS swing gate opener is a powerful, heavy-duty automatic gate motor designed for Australian homes, farms, and large properties. Built to handle gates up to 450kg and 5 metres long, this system is ideal for oversized, cladded, or rural swing gates where standard motors simply aren’t strong enough. Whether you need a solar-powered gate opener for remote access or a reliable electric system for your driveway, the TMT 400LLS delivers consistent performance, durability, and smooth operation.
From $1055 – $1,994
TMT gate automation
STEP 1.

Solar vs electric — which is right for you?

The TMT 400LLS comes in both versions, so you can match it to your power situation rather than your gate type.
Both kits use the same actuator and control system — the only difference is how it's powered.

Solar

Best for
  • Farms and acreage properties
  • Rural driveways and remote entrances
  • Areas without access to 240V power
Why choose it
  • No trenching or electrical work required
  • Lower installation cost
  • Environmentally friendly

Electric

Best for
  • Suburban homes
  • Driveway entrances near mains power
  • High-use gates opened several times a day
Why choose it
  • Consistent power supply, no reliance on sunlight
  • Ideal for frequent daily use
  • Simple setup if 240V is already nearby
STEP 2.

Kits & pricing

Choose single (one gate leaf) or double (two leaves), then your power type. Every kit includes the actuator, control system, remotes and mounting hardware.
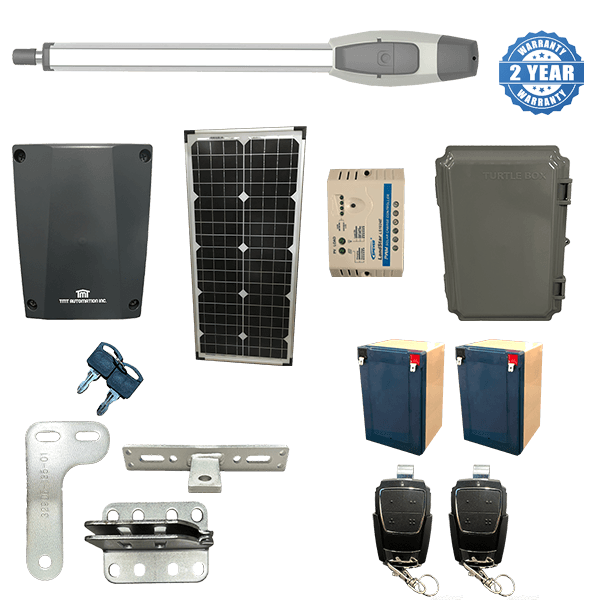
Single Gate - Solar kit

$1435 BUY NOW

TMT Single solar kit

Kit Inclusions

  • 1 x Actuator arm
  • 1 x Control box
  • 1 x Control board
  • 2 x remotes (with 2 free visor/holders)
  • 2 x Release keys
  • Post/gate brackets
  • 1 x Warning sign
  • 24Volt 40watt solar panel with mounting bracket & 10mtrs cable
  • 20A PWM Solar Regulator
  • 2 x 12v 14ah deep cycle batteries
  • 1 x Battery box with steel mounting bracket
  • Supporting wires
  • 1 @ 2mtrs pre wired 7 core arm cable
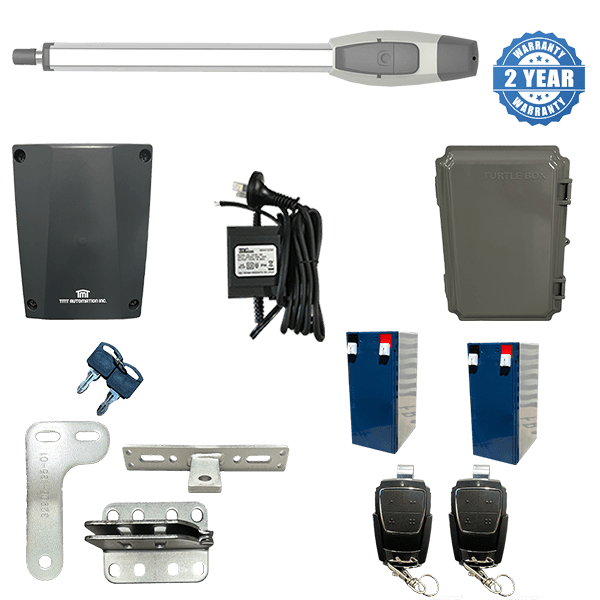
Single Gate - Electric kit

$1055 BUY NOW

TMT Single electric kit

Kit Inclusions

  • 1 x Actuator arm
  • 1 x Control box
  • 1 x Control board
  • 2 x remotes (with 2 free visor/holders)
  • 2 x Release keys
  • Post/gate brackets
  • 1 x Warning sign
  • 1 x 24Volt Outdoor Transformer with 1mtr cable
  • 1 @ 2mtrs pre wired 7 core arm cable
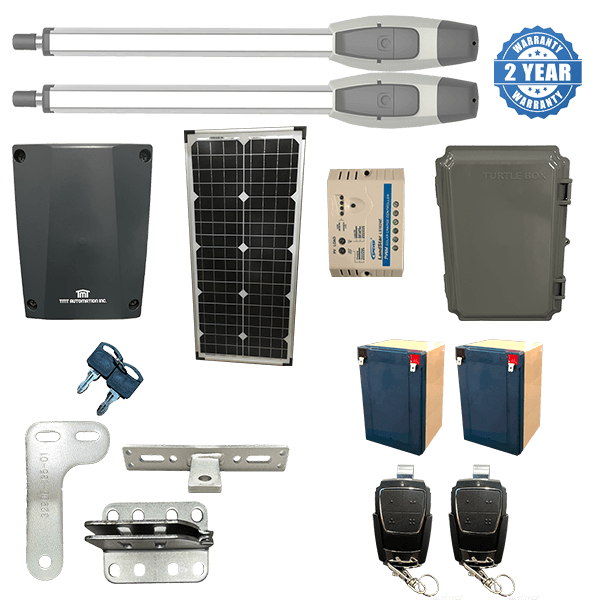
Double Gate - Solar kit

$1895 BUY NOW

TMT double solar kit

Kit Inclusions

  • 2 x Actuator arm
  • 1 x Control box
  • 1 x Control board
  • 2 x remotes (with 2 free visor/holders)
  • 4 x Release keys
  • Post/gate brackets
  • 1 x Warning sign
  • 24Volt 40watt solar panel with mounting bracket & 10mtrs cable
  • 20A PWM Solar Regulator
  • 2 x 12v 14ah deep cycle batteries
  • 1 x Battery box with steel mounting bracket
  • Supporting wires
  • 1 @ 2mtrs and 1 @ 12mtrs pre wired 7 core arm cable
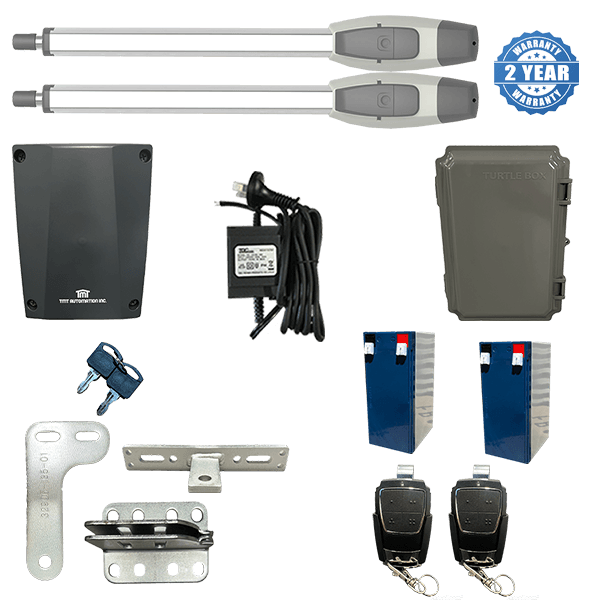
Double Gate - Electric kit

$1495 BUY NOW

TMT Double electric kit

Kit Inclusions

  • 2 x Actuator arms
  • 1 x Control box
  • 1 x Control board
  • 2 x remotes (with 2 free visor/holders)
  • 4 x Release keys
  • Post/gate brackets
  • 1 x Warning sign
  • 1 x 24Volt Outdoor Transformer with 1mtr cable
  • 1 @ 2mtrs and 1 @ 12mtrs pre wired 7 core arm cable
Electric Kit
Electric Kit with backup battery
Solar Kit
BUILT FOR THE JOB

TMT Gate Opener Features

The TMT is designed for property owners who need more power and reliability than standard gate motors offer.
  • Compatible with single or dual swing gates
  • Remote control access included
  • Adjustable opening and closing speeds
  • Soft start and stop functionality
  • Safety stop/reverse on obstruction
  • Heavy-Duty Performance
  • Auto-close up to 5 min
  • Easy manual release by key
BEFORE YOU BUY

Specifications & Gate Compatibility

Confirm your gate matches these limits before ordering.
Max gate length 5m per leaf
Max gate weight 450kgs @ 3mtrs - 300kgs @ 5mtrs
Gate type Heavy duty - enclosed gates
Power options Solar or low voltage electric
Gear type Screw drive
Max output power 144 watts per motor
OPTIONAL ADD ONS

Build out your kit

Most customers order the base kit alone — these are here if your gate or property needs something extra.
  • round gate bracket

    Round Gate Bracket $65/ea

    For round tube farm gates frames.

    View more

  • round post bracket

    Round Post Brackets $35/ea

    For gates swinging from a round post.

    View more

  • push out bracket

    Outward Opening Bracket $35/ea

    For push-to-open gates with the arm inside the property.

    View more

  • remote

    Extra Remote $50/ea

    Additional handheld remote.

    View more

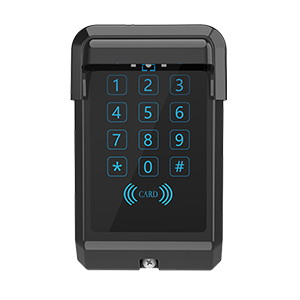
  • keypad

    Wireless Keypad $165/ea

    Visitor access by pin number.

    View more

  • wireless push button

    Hard Wired Button $35/ea

    Visitor access by push button.

    View more

  • button

    Hard Wired Button $35/ea

    Wired visitor push button.

    View more

  • long range receiver

    Long Range Receiver $90/ea

    Extends remote distance.

    View more

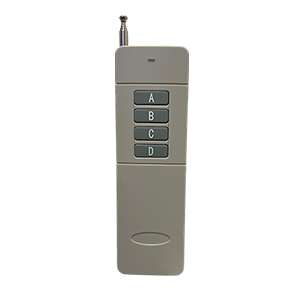
  • long range remote

    Long Range Remote $60/ea

    Open the gate from inside the house.

    View more

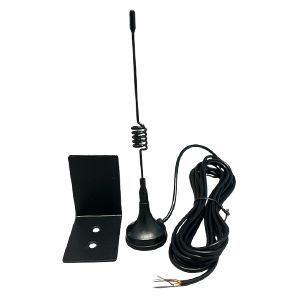
  • antenna booster

    Antenna Booster $45/ea

    Boosts distance on standard remotes.

    View more

  • electric gate lock

    Electric Gate Lock $165/ea

    Extra gate security.

    View more

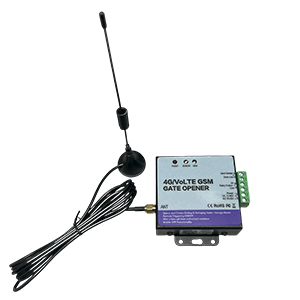
  • gsm gate opener

    4G GSM Gate Opener $240ea

    Operates the gate via mobile phone.

    View more

COMMON QUESTIONS
Frequently asked questions
Will this system work if my gate swings outward?

Yes. The TMT can be set up for an inward or outward swinging gate, and you can still have the actuator arm on the inside of the property. If that's your preferred setup, order the TMT outward opening bracket.

Will the solar still work in cloudy weather?

Yes. Energy is stored in the battery, so the gate keeps operating through low-sunlight periods.

Can I install the TMT myself?

Yes. It's built for DIY installation and comes with instructions & basic handyman skills are usually enough.

How long does installation take?

Typically 3–6 hours, depending on site conditions and experience level.

What maintenance does it need?

Very little. Just check moving parts, battery condition (solar kits), and gate alignment from time to time.

Can I add accessories later?

Yes. The system works with keypads, sensors, and remote access modules added any time after install.

More FAQS

WHY BUY FROM BMGI

Support and reliability matter just as much as the product

Expert advice before purchase
Ongoing technical support
Reliable, tested
products
Fast Australia-wide shipping

Ready to automate your gate?

Whether it's a solar gate opener for a farm or a simple electric system for your driveway,
the TMT delivers reliable performance without the complexity or cost of heavy-duty alternatives.

Shop TMT Kits

Read more: TMT 400LLS swing gate automation

  • Hits: 56361

My gate opens but wont close

My gate opens but won't close

If you find that your gate opens perfectly fine and doesn't close, this could be why. On your main control board there is an NC light that should be on at all times (see image B below). If this light isn't on then the control board thinks there is an obstruction within the gate way area and will not allow the gate to close.

There should be a small loop wire (see image C) between COM and NC on the control board. If the loop wire is there then just tighten up both screws. However, if the loop wire is missing, just add a small piece of wire/cable between COM and NC. Once the screws are tightened up, the NC light should come on. Now activate the gate with an accessory to check that the gate will close.

E8 D1 swing control board E8 D1 swing control board

Read more: My gate opens but wont close

  • Hits: 32365